玩转树莓派
官方操作系统
https://www.raspberrypi.org/downloads/raspbian/
带桌面版1.4G
精简版293MB 下载 wget https://downloads.raspberrypi.org/raspbian_lite_latest
安装其他操作系统
CentOS
CentOS7官方支持了AMRV7发布了树莓派2、香蕉派、以及CubitTruck单片机的版本
CentOS7官方下载 root 密码 centos 大约275MB
http://mirror.centos.org/altarch/7.4.1708/isos/armhfp/
ArchLinux
树莓派1 https://archlinuxarm.org/platforms/armv6/raspberry-pi
树莓派2 https://archlinuxarm.org/platforms/armv7/broadcom/raspberry-pi-2
树莓派3 https://archlinuxarm.org/platforms/armv8/broadcom/raspberry-pi-3
有国内的下载镜像 https://mirrors.tuna.tsinghua.edu.cn/archlinuxarm/os/
大约293MB
安装OSMC
下载一览,选择Disk images,此系统较省资源,默认开机进入OSMC,img.gz 大小约160M
OSMC_FILE=OSMC_TGT_rbp2_20160621.img.gz
cd /data/tmp
axel -n 20 http://download.osmc.tv/installers/diskimages/$OSMC_FILE
md5sum $OSMC_FILE
ls -lh
查看所有版本 http://download.osmc.tv/installers/diskimages/
使用清华大学镜像站国内下载速度更快: https://mirrors.tuna.tsinghua.edu.cn/osmc/osmc/download/installers/
插入内存卡,开始烧写到内存卡中.烧写之前需要取消挂载
diskutil list 查看你的内存卡的挂载位置,取消挂载
执行diskutil unmountdisk /dev/disk2 取消挂载,需要稍等一小会.
烧写,烧写过程中读卡器不断闪烁.
gzip -dc /data/tmp/$OSMC_FILE | sudo dd of=/dev/disk2 bs=8k
dd的用法: dd if=/dev/zero of=hello.txt bs=1024
dd过程中看不到进度,如果确实想要了解进度,可以再开一个终端pkill -USR1 -n -x dd查看进度.
Mac上不能使用-USR1方式查看dd进度,会直接kill掉,可以使用在执行dd时插入pv查看进度 , 先安装pvbrew install pv
sudo dd if=file_1 | pv | dd of=file_2
在Mac OSX 上,可以使用/dev/rdisk2 代替/dev/disk2 , 速度能有大幅度提升
gzip -dc OSMC_TGT_rbp2_201*.img.gz | pv | sudo dd of=/dev/rdisk2 bs=512k
确定内存卡的最佳写入块大小,分别执行如下命令,查看速度
dd if=/dev/zero bs=1024 count=65536 of=/tmp/64mb
dd if=/dev/zero bs=2048 count=32768 of=/tmp/64mb
dd if=/dev/zero bs=4096 count=16384 of=/tmp/64mb
dd if=/dev/zero bs=8192 count=8192 of=/tmp/64mb
我的内存卡 4096 比较快,能有90MB/s
busybox dd 测试 /dev/shm
time dd bs=64k count=1k if=/dev/zero of=test conv=fsync
如果是iso文件,需要装换为img文件,
hdiutil convert -format UDRW -o /path/to/generate/img/file /path/to/your/iso/file
mac osx会默认追加一个.dmg,这个没有影响,然后就可以使用dd写入这个img文件了.
diskutil eject /dev/disk1 弹出USB,注意和卸载(unmountdisk)是不同的
OSMC默认的ssh连接用户是 osmc 密码 osmc
播放界面
切换字幕快捷键
t查看属性i播放器菜单m
但是发现 OSMC 无法播放rmvb,只有声音,没有图像
由于rmvb无法硬解,又不是开源格式,树莓派无法解码,只能通过ffmpeg转换格式 (OSMC2017.05版本已可播放Real Video文件,树莓派2播放超清1080P 2.3GB大文件CPU近乎满载,基本流畅播放)
转换为MP4格式最为通用,但是发现较慢,也不能边转码,边播放.
可以转换到flv格式,flv格式能够播放,并且还能边转码边播放!
设置比特率高些,不然会不清楚.这里分辨率设置为1280x720,更大分辨率要适当加大比特率.
ffmpeg -i xx.rmvb -s 1280x720 -b 4M a.flv
osmc 启用 root 登陆
sudo passwd --unlock root
修改root密码
sudo passwd root
定时关机 sudo shutdown -t 60(一个小时后关机) -t参数后面是分钟.
修改为国内镜像源
/etc/apt/sources.list原先内容 (debian9)
deb http://ftp.debian.org/debian stretch main contrib non-free

deb http://ftp.debian.org/debian/ stretch-updates main contrib non-free

deb http://security.debian.org/ stretch/updates main contrib non-free

deb http://apt.osmc.tv stretch main
修改为
deb http://mirrors.tuna.tsinghua.edu.cn/debian stretch main contrib non-free

deb http://mirrors.tuna.tsinghua.edu.cn/debian/ stretch-updates main contrib non-free

deb http://mirrors.tuna.tsinghua.edu.cn/debian-security/ stretch/updates main contrib non-free

deb http://ftp.fau.de/osmc/osmc/apt/ stretch main
http://ftp.fau.de/osmc/osmc/apt/ 也可以是
http://mirrors.tuna.tsinghua.edu.cn/osmc/osmc/apt/
arm php7.1 http://repozytorium.mati75.eu/raspbian/pool/main/p/php7.1/
在 http://www.debian.org/mirror/list 查看有多个国内镜像源
执行更新sudo apt update -y && sudo apt upgrade -y
安装常用工具sudo apt install htop tree file telnet screen curlftpfs aria2
安装zsh,可通过CURL或者WGET安装 https://github.com/robbyrussell/oh-my-zsh
chsh -s /bin/zsh
安装openelec
openelec 镜像下载,osmc是基于debain的,系统更加完善.此系统相比osmc更加精简,是专为跑kodi精简的系统. img.gz 大小约102M
openelec 2018年后已不再更新
1G内存卡也能安装
libreelec
https://libreelec.tv/downloads_new/raspberry-pi-2/
LibreELEC 大约126M
但1G内存卡启动不了
OpenELEC 大约135M
OSMC 大约229M
dietpi
lakka
http://www.lakka.tv/get/linux/rpi2/
用户名 root 密码 root
系统刷入后,需要修改根目录下config.txt文件
添加
hdmi_group=1
hdmi_mode=16
使之工作在1080p 60hz 下, 不然默认的分辨率比较低
中文乱码问题
找一个中文字体复制到
/storage/assets/xmb/monochrome/font.ttf
没有xmb/monochrome文件夹,可以自己建
然后重启
没有声音是因为config.txt文件中hdmi_drive=2 这行配置被注释了。将其注释去掉即可。
安装xbian
与openelec,osmc都是类似,img.gz较大,大约316MB
安装ChromeOs
ChromeOs已经有支持树莓派的版本了
安装 flintos
flintos 相当于中国版的ChromeOS,对各种硬件适配更好.
下载img.xz 后,刻录操作同osmc,镜像大小比osmc要大不少.
diskutil unmountdisk /dev/disk2
xz -dc flintos_rpi_v0.3.img.xz | pv | sudo dd of=/dev/rdisk2 bs=512k
播放器
https://github.com/popcornmix/omxplayer
树莓派系统Raspbian源里面有 执行 sudo apt update && sudo apt install omxplayer 就可以安装
但是 debain 源里面没有, 由于我使用的OSMC,也需要自己下载安装
有编译好的提供下载 http://omxplayer.sconde.net/
apt install libpcre3 fonts-freefont-ttf fbset
wget http://omxplayer.sconde.net/builds/omxplayer_0.3.7~git20170130~62fb580_armhf.deb
sudo dpkg -i omxplayer_0.3.7~git20170130~62fb580_armhf.deb
安装后omxplayer -v 检查是否成功 omxplayer -h 查看使用帮助
omxplayer 播放器 可由命令行执行,输出视频到hdmi omxplayer -p -o hdmi test.mkv
alias play='omxplayer -r -o hdmi'
经测试omxplayer播放器并没有OSMC自带播放器好,omxplayer有时会有卡顿.
omxplayer 取代了OSMC的GUI界面 可以使用 sudo systemctl restart mediacenter 恢复
通过命令行输出图片到hdmi
fbi *.jpg
见 https://raspberrypi.stackexchange.com/questions/8922/how-do-i-display-images-without-starting-x11
树莓派推流到Youtube实现直播
首先需要安装 ffmpeg, 未安装可以去下载对于arm7的静态编译版本 http://johnvansickle.com/ffmpeg/
还需要使用raspivid和raspistill命令, 一个是对于视频的,一个是对于图片的.OSMC已自带这两个命令行工具.
raspiyuv 这个也是操作摄像头的
插入摄像头后一般会有 /dev/video0 文件.
执行 vcgencmd get_camera 查看结果.
结果是 supported=1 detected=0 , 可能是驱动还没加载,还无法使用.
执行 grep "bcm2835-v4l2" /etc/modules 没有结果
我们需要手动将bcm2835-v4l2写入到此文件中. 然后reboot重启, 此配置只需配置这一次,就是告诉内核每次开机后加载摄像头驱动.
raspistill -o foobar.jpg 拍一张照片
由于我使用的是USB摄像头,并非GPIO摄像头,故使用方式不一样
USB摄像头需sudo apt install fswebcam
fswebcam image.jpg 可以拍摄照片.
ffmpeg -f v4l2 -framerate 30 -video_size 640x480 -i /dev/video0 output.flv 可以捕获视频.
实时录制 ffmpeg -f v4l2 -framerate 30 -video_size 640x480 -i /dev/video0 -f flv pipe:1 | nc 192.168.1.102 5001
接收端播放 nc -l 5001 | mpv -
https://maxogden.com/hd-live-streaming-cats.html
配置镜像加速
一:树莓派常用软件源列表
中山大学
Raspbian http://mirror.sysu.edu.cn/raspbian/raspbian
中国科学技术大学
Raspbian http://mirrors.ustc.edu.cn/raspbian/raspbian/
清华大学
Raspbian http://mirrors.tuna.tsinghua.edu.cn/raspbian/raspbian/
大连东软信息学院源(北方用户)
Raspbian http://mirrors.neusoft.edu.cn/raspbian/raspbian/
重庆大学源(中西部用户)
Raspbian http://mirrors.cqu.edu.cn/Raspbian/raspbian/
二、树莓派修改软件源的方法
编辑/etc/apt/sources.list文件。删除原文件所有内容,用以下内容取代:
deb http://mirrors.ustc.edu.cn/raspbian/raspbian/ wheezy main non-free contrib

deb-src http://mirrors.ustc.edu.cn/raspbian/raspbian/ wheezy main non-free contrib
编辑此文件后,请使用sudo apt-get update命令,更新软件列表。
这样树莓派更新软件就会使用中国科学技术大学的镜像源,从而大大提高更新速度,要使用其他的软件源,根据以上代码就行修改。
关于各种派的性能比较
树莓派3仅仅插单个tf卡一般功率为2.5W 树莓派2更少
每度电0.5元,一年不间断运行.按此计算 一年电费
2.5*24*365/1000*0.5=10.95
不足一顿午饭钱,相当于200W的台式机不间断工作5天
https://www.zhihu.com/question/37202806
Tinker Board 比树莓派3性能更好,更贵
其他嵌入式单片机有 nodemcu,直接包含wifi/蓝牙 适合物联网开发.
参数一览
https://cdn.shopify.com/s/files/1/1098/4826/files/comparisonupdate.png?13077955502273113275
温度 /opt/vc/bin/vcgencmd measure_temp
watch /opt/vc/bin/vcgencmd measure_temp
参考
https://ky0n.xyz/osmc-init/
http://blog.laolilin.com/posts/2016/10/config_raspberry_pi.html#.WBR2huF96Rs
https://www.zybuluo.com/yangxuan/note/321467
关于 arm cpu性能
大八核A80以问鼎国内主控芯片性能第一位的姿态把控着专业游戏盒子市场
搜索到a53-a15好像是快48%
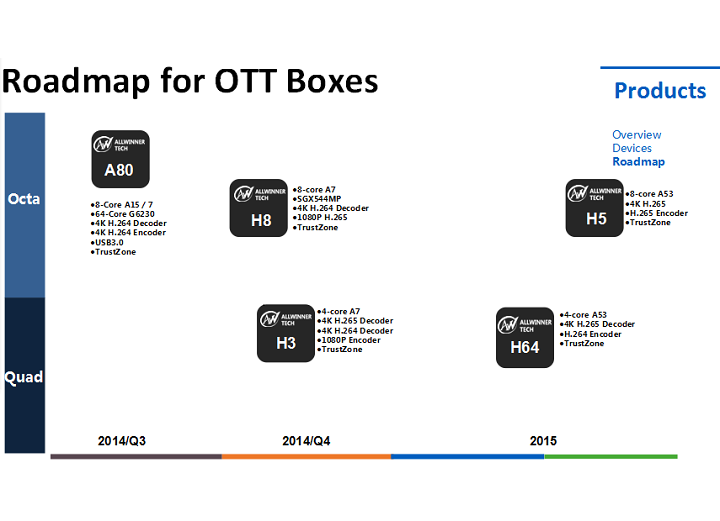
A80 H8 H5都是八核。
A80是全志最初面向平板市场开发的高性能处理器,不过生不逢时,现在也用到了盒子上。A80处理器基于四核A15+四核A7的架构,GPU配置出色,安兔兔跑分能突破5W大关。它支持4K解码和4K输出,界面本身为1080P规格。相关产品多配备2GB内存,个别机型甚至会用上4GB内存,多出现于一些主打高性能的盒子产品上
四核A53架构的H64与八核A53架构的H5方案都在规划当中,将逐渐取代现有的H8和H3方案
全志OTT处理器以H3、H5和H8为主,其中H3和H8都是老旧的Cortex-A7架构设计,而H5则升级到了最新Cortex-A53架构,并集成Mali-450MP6 GPU。
以由高到低的方式来看,ARM处理器大体上可以排序为:Cortex-A57处理器、Cortex-A53处理器、Cortex-A15处理器、Cortex-A12处理器、Cortex-A9处理器、Cortex-A8处理器、Cortex-A7处理器、Cortex-A5处理器。其中A53、A9、A7和A5是网络机顶盒芯片厂商使用最多的。
Cortex-A53、Cortex-A57两款处理器属于Cortex-A50系列,采用64位ARMv8架构。
ARM Cortex-A15处理器隶属于Cortex-A系列,基于ARMv7-A架构。
ARM Cortex-A9处理器隶属于Cortex-A系列,基于ARMv7-A架构。
ARM Cortex-A8处理器隶属于Cortex-A系列,基于ARMv7-A架构,是我们目前使用的单核手机中最为常见的产品。
ARM Cortex-A7处理器隶属于Cortex-A系列,基于ARMv7-A架构,它的特点是在保证性能的基础上提供了出色的低功耗表现。
ARM Cortex-A5处理器隶属于Cortex-A系列,基于ARMv7-A架构,是能效最高、成本低的处理器。
以由高到低的方式来看,ARM处理器大体上可以排序为:
Cortex-A72处理器、Cortex-A57处理器、Cortex-A53处理器、Cortex-A15处理器、Cortex-A12处理器、Cortex-A9处理器、Cortex-A8处理器、Cortex-A7处理器、Cortex-A5处理器、ARM11处理器、ARM9处理器、ARM7处理器
ARM发布了自己的下一代核心Cortex-A72,A72将会直接取代A57,定位高端市场。
arm8的A53对应arm7的A7 A57对应A15
官方介绍 https://www.arm.com/products/processors/cortex-a
http://dkmc.tv/2016/11/24/how-to-detect-performance-of-smart-tv-and-tv-box/?lang=pt
http://irunhuayou.com/keji/ruanjian/1120329.html
http://www.allwinnertech.com/uploads/150416/7-15041610492JA.jpg
http://dkmc.tv/wp-content/uploads/2016/11/arm-cortex-xxx.jpg
http://www.21ic.com/eva/MCU/201604/669727.htm
树莓派3的CPU性能
https://www.znds.com/forum.php?mod=viewthread&tid=1118965&orderby=dateline
bash 乱码设置
env 查看当前编码
之前的值LANG=C
需要清除 unset LANG
locale -a | grep zh 查看支持的中文编码
export LANG=zh_CN.UTF-8
有时候可能还需要设置LC_ALL=zh_CN.utf8 , 可直接export LC_ALL=zh_CN.utf8加入~/.bashrc中
setlocale: LC_ALL: cannot change locale (zh_CN.utf8)
直接执行locale, 如果出现
locale: Cannot set LC_CTYPE to default locale: No such file or directory
locale: Cannot set LC_MESSAGES to default locale: No such file or directory
locale: Cannot set LC_ALL to default locale: No such file or directory
sudo apt-get install zhcon
树莓派 alpine
直接将内存卡格式化为fat32 (使用mac自带的磁盘工具抹掉就行)
https://mirrors.cloud.tencent.com/alpine/v3.11/releases/armv7/
下载 alpine-rpi-3.11.5-armv7.tar.gz
解压
然后copy到内存卡
加电启动,登陆使用root
setup-alpine
选键盘布局输入 us